
Fact-checked by the VisualEnews editorial team
Most people assume that automating their home costs thousands of dollars and requires a professional installer. The average professionally installed smart home system runs between $2,000 and $10,000, according to data from HomeAdvisor — and that figure doesn’t include monthly subscription fees that quietly drain your wallet year after year. For renters, first-time homeowners, and budget-conscious tech enthusiasts, budget smart home automation has always seemed like a contradiction in terms.
The global smart home market reached $121 billion in 2023 and is projected to exceed $338 billion by 2030, yet surveys consistently show that cost remains the number-one barrier to adoption. A 2023 Parks Associates report found that 54% of non-smart-home owners cite upfront hardware costs as the primary reason they haven’t made the switch. Meanwhile, energy costs keep climbing — the U.S. Energy Information Administration reports that average residential electricity bills rose 5% in 2023 alone, making home automation’s efficiency gains more valuable than ever.
This guide documents exactly how one solo developer built a fully functional, deeply automated smart home for under $500 — covering hardware choices, software stacks, automation logic, and real energy savings data. You’ll walk away with a concrete shopping list, a step-by-step build plan, and the knowledge to avoid every expensive mistake along the way.
Key Takeaways
- A fully automated smart home is achievable for under $500 using open-source software and carefully selected hardware.
- Home Assistant, a free open-source platform, powers over 500,000 active installations worldwide and eliminates monthly subscription fees that typically cost $5–$30/month per service.
- Smart plugs average $8–$15 each and can reduce standby power waste by up to 10%, saving roughly $100–$150 per year on a typical U.S. electricity bill.
- A Raspberry Pi 4 (4GB RAM) costs approximately $55 and serves as a capable local automation hub, processing all logic without cloud dependency.
- The developer in this guide recouped his entire $487 investment in 14 months through reduced energy bills and eliminated subscription costs.
- Zigbee-based devices cost 30–50% less than Z-Wave equivalents while offering comparable reliability for most residential automation use cases.
In This Guide
- Why DIY Beats Commercial Smart Home Systems
- Choosing Your Automation Hub
- The Full Budget Hardware Breakdown
- Zigbee vs Z-Wave vs Wi-Fi: Protocol Wars
- Setting Up Home Assistant on a Budget
- Building Smart Automation Logic
- Energy Monitoring and Real Savings
- Security, Privacy, and Local Control
- Scaling Your System Beyond $500
- Budget Smart Home Pitfalls to Avoid
Why DIY Beats Commercial Smart Home Systems
Commercial smart home ecosystems — Google Home, Amazon Alexa, Apple HomeKit — are brilliantly marketed but fundamentally designed to lock you in. Each platform charges for premium features, limits which third-party devices you can use, and routes all your data through their servers. When Google discontinued Nest Secure in 2020, thousands of users lost hundreds of dollars in hardware overnight.
The hidden cost of subscription-based smart home services adds up fast. A typical setup might include a $10/month security monitoring plan, a $5/month premium automation tier, and cloud storage for camera footage at $4/month. That’s $228 per year in recurring fees — before you’ve bought a single bulb. Just as digital subscriptions quietly drain your budget, smart home subscription creep can cost you hundreds annually without you noticing.
DIY systems with local processing eliminate these fees entirely. They also outlast commercial alternatives. Many users are still running Home Assistant setups built in 2018 on hardware that cost $35 at the time.
The True Cost of “Cheap” Commercial Systems
A starter Amazon Echo kit bundled with four smart plugs and two bulbs costs around $120. That sounds affordable — until you factor in the ecosystem costs. Alexa’s advanced routines require Alexa Guard Plus at $4.99/month. Ring cameras, which integrate tightly with Alexa, add $3.99–$10/month for cloud storage.
Over three years, a modest Alexa-based setup can cost $400–$600 in subscriptions alone. A DIY Home Assistant system running on a $55 Raspberry Pi has zero recurring costs after initial setup.
The average smart home owner pays $228/year in smart home service subscriptions — costs that a local, open-source DIY system eliminates entirely from day one.
Open Source vs. Proprietary: A Direct Comparison
| Factor | Commercial (Alexa/Google) | DIY (Home Assistant) |
|---|---|---|
| Upfront Cost | $150–$400 | $55–$100 (hub only) |
| Monthly Fees | $10–$30/month | $0 |
| Device Compatibility | Ecosystem-limited | 5,000+ integrations |
| Data Privacy | Cloud-dependent | 100% local option |
| Customization | Limited | Unlimited |
| 3-Year Total Cost | $510–$1,480 | $300–$500 |
Choosing Your Automation Hub
The automation hub is the brain of your smart home. It runs your software, processes automations, and communicates with devices. Choosing the right one sets a ceiling on what your system can ever do — and a floor on what it will cost.
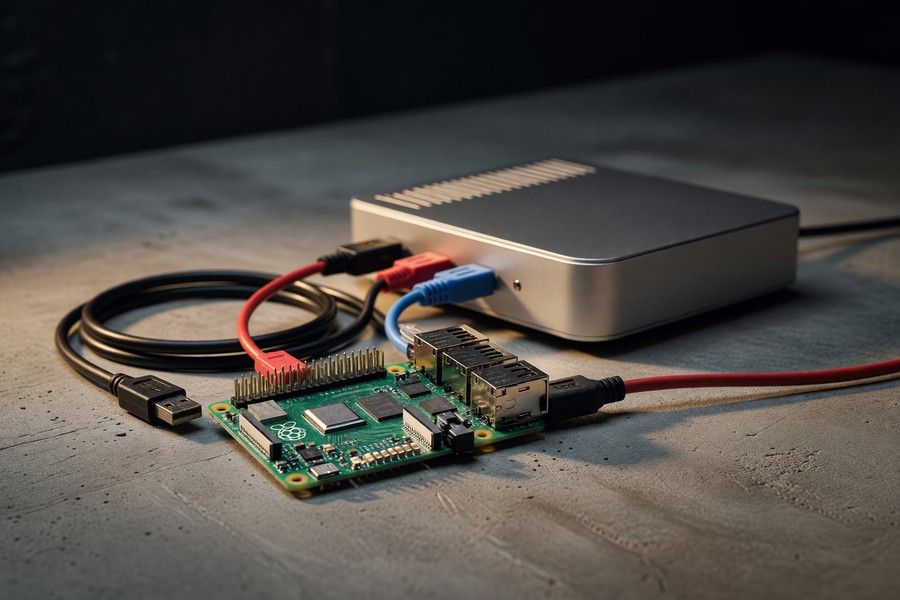
The Raspberry Pi 4 (4GB model) is the most popular choice for Home Assistant deployments. At roughly $55 from approved resellers, it offers enough processing power to run hundreds of automations simultaneously. It draws just 3–5 watts of continuous power, costing less than $4/year to run 24/7.
Hub Hardware Options Compared
| Device | Cost | RAM | Best For |
|---|---|---|---|
| Raspberry Pi 4 (4GB) | $55 | 4GB | Most users — best balance |
| Raspberry Pi Zero 2W | $15 | 512MB | Very small setups, minimal automations |
| Intel NUC (used) | $80–$120 | 8–16GB | Power users, camera processing |
| ODROID N2+ | $65 | 4GB | Alternative to Pi, often more available |
| Old Laptop/PC | $0 (repurposed) | Varies | Budget builds using existing hardware |
The developer in this guide used a Raspberry Pi 4 (4GB) purchased for $55 from CanaKit. He paired it with a 64GB microSD card ($9) and an official power supply ($8), bringing the hub total to $72. He later migrated the OS to a USB SSD for $18, improving reliability significantly — a step covered in the SSD vs HDD performance comparison.
Home Assistant OS (HAOS) is specifically optimized for Raspberry Pi hardware. It boots in under 60 seconds and uses less than 800MB of RAM at idle, leaving plenty of headroom for complex automations.
The Full Budget Hardware Breakdown
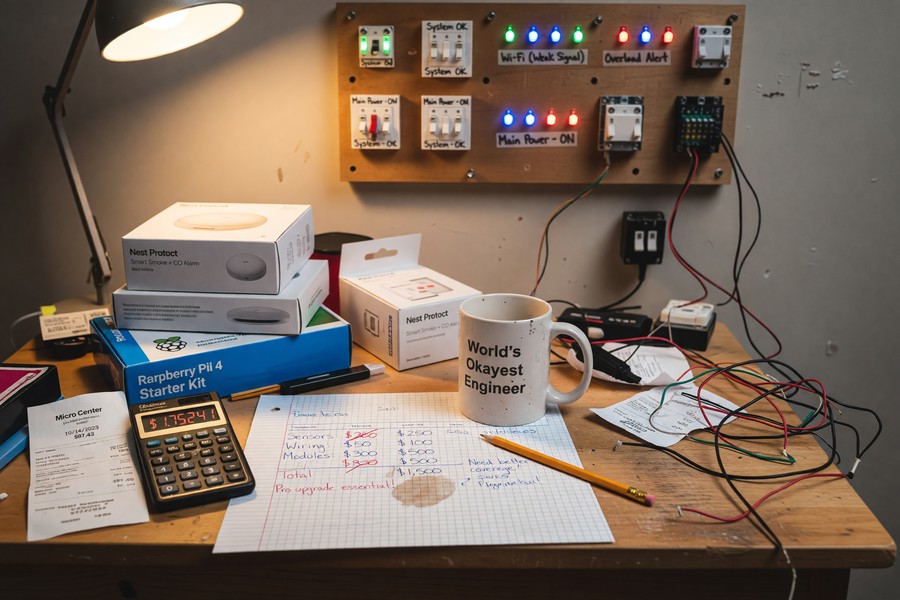
The developer, Marcus Chen, documented every purchase with receipts and shared his build publicly on GitHub. His final tally came to $487.43 — covering 27 devices across a 1,200-square-foot two-bedroom apartment. Here’s the exact breakdown.
Complete $500 Build Shopping List
| Item | Quantity | Unit Cost | Total |
|---|---|---|---|
| Raspberry Pi 4 (4GB) + PSU + SD Card | 1 | $72 | $72.00 |
| SONOFF Zigbee USB Dongle Plus | 1 | $20 | $20.00 |
| IKEA TRADFRI Zigbee Bulbs | 8 | $8 | $64.00 |
| Sonoff ZBMINI Zigbee Switches | 4 | $12 | $48.00 |
| SONOFF S31 Smart Plugs (Zigbee) | 6 | $11 | $66.00 |
| Aqara Door/Window Sensors | 6 | $10 | $60.00 |
| Aqara Motion Sensors | 4 | $15 | $60.00 |
| Sonoff SNZB-02 Temp/Humidity Sensor | 2 | $11 | $22.00 |
| SanDisk 64GB USB SSD Boot Drive | 1 | $18 | $18.00 |
| Misc cables, plugs, mounts | — | — | $57.43 |
| TOTAL | — | — | $487.43 |
Where to Find the Best Prices
Marcus sourced most hardware from AliExpress (for Zigbee sensors), Amazon (for convenience items), and IKEA’s in-store smart home section. AliExpress prices for Zigbee sensors run 30–40% cheaper than Amazon, though shipping takes 2–4 weeks.
He also scored two smart plugs from a Facebook Marketplace listing for $3 total — a reminder that the secondhand market for smart home gear is surprisingly active. Devices using open protocols like Zigbee work regardless of who originally owned them.
Buy Zigbee devices in small batches of 4–6 at a time. This lets you confirm compatibility with your specific Zigbee coordinator before committing to a larger purchase. Most devices are returnable within 30 days, but batch-testing saves time.
Zigbee vs Z-Wave vs Wi-Fi: Protocol Wars
Choosing the right wireless protocol is the most technically consequential decision in any budget smart home automation build. The wrong choice means devices that don’t talk to each other, or a mesh network that collapses when one node goes offline.
Zigbee is a low-power, mesh-networking protocol operating on the 2.4GHz band. Devices are cheap — often $8–$15 — and form a self-healing mesh where every mains-powered device acts as a router. The SONOFF Zigbee USB Dongle Plus costs $20 and pairs with Home Assistant’s ZHA (Zigbee Home Automation) integration instantly.
Protocol Comparison for Budget Builders
| Protocol | Avg Device Cost | Hub/Dongle Cost | Range | Best Use |
|---|---|---|---|---|
| Zigbee | $8–$15 | $20 | 30–100ft mesh | Budget builds, sensors, bulbs |
| Z-Wave | $25–$60 | $50–$100 | 100ft+ mesh | Premium reliability, locks |
| Wi-Fi | $10–$25 | $0 (uses router) | Router-dependent | High-bandwidth devices, cameras |
| Matter/Thread | $20–$40 | $0–$30 | Thread mesh | Future-proofing, cross-platform |
| Bluetooth | $5–$20 | $0 (Pi has BT) | 30ft direct | Temperature sensors, presence |
Marcus built his entire system on Zigbee for a reason: 27 Zigbee devices from five different manufacturers all paired seamlessly using ZHA. No hub fees, no proprietary bridges, and total device cost averaging $12.50 each. Understanding how wireless protocols interact also connects to broader questions around next-generation wireless technology choices worth considering as you expand your setup.
When Wi-Fi Devices Make Sense
Wi-Fi devices shine for high-bandwidth applications — cameras, video doorbells, and smart TVs. They’re also universally compatible without any hub or dongle. The downside: each Wi-Fi device consumes a slot on your router’s DHCP table and adds RF congestion.
Marcus used one Wi-Fi device: a TP-Link Tapo C100 camera ($23) for his front door. Everything else ran on Zigbee. This hybrid approach — Zigbee for sensors and switches, Wi-Fi for cameras — is widely regarded as the optimal budget strategy.
“Zigbee’s mesh topology means your network gets stronger as you add more devices, not weaker. For budget deployments, that self-healing architecture is invaluable — you’re not paying for a dedicated hub for every device category.”
Setting Up Home Assistant on a Budget
Home Assistant is the undisputed king of open-source home automation software. It runs on a Raspberry Pi, supports over 3,000 integrations, and has an active community of more than 500,000 monthly active users. Most importantly, it’s completely free.
Installation takes about 20 minutes. Download the Home Assistant OS image from the official site, flash it to your microSD card using Balena Etcher (free), insert it into your Pi, and connect to the web UI at homeassistant.local:8123. The initial setup wizard handles the rest.
Essential Add-Ons That Cost Nothing
Home Assistant’s add-on ecosystem extends functionality dramatically. The following add-ons are free and form the backbone of Marcus’s setup:
- Zigbee2MQTT — Alternative Zigbee integration with broader device support than ZHA
- Node-RED — Visual automation builder for complex logic flows
- Grafana + InfluxDB — Real-time energy and sensor dashboards
- HACS (Home Assistant Community Store) — Unofficial integrations and custom UI cards
- Mosquitto Broker — Local MQTT server for device communication
- File Editor — Edit configuration YAML directly from the browser
Marcus spent his first weekend configuring these add-ons. By Sunday evening, he had a fully functional dashboard showing real-time power consumption for every outlet in his apartment — something a $200 commercial energy monitor couldn’t match.
Home Assistant processes all automations locally by default. Even if your internet connection drops for days, every scheduled automation, sensor trigger, and device command continues working without interruption.
Cloud vs. Local Processing: Why It Matters
Commercial systems like Google Home route every command to a remote server — even if the device is two feet away. This introduces 200–800ms of latency and creates a single point of failure. When Google’s servers had a 3-hour outage in August 2023, millions of users lost control of their lights and thermostats.
Home Assistant processes everything locally. A motion sensor triggering a light takes 50–100ms — imperceptible to humans. And since your data never leaves your network, there’s no privacy exposure. This local-control philosophy also dovetails with broader concerns about protecting your digital identity in an increasingly connected home environment.
Building Smart Automation Logic
Hardware is just the foundation. The real intelligence lives in your automation logic — the rules that make your home feel genuinely smart rather than just remote-controlled. Marcus built 34 distinct automations over two months, starting simple and growing more sophisticated over time.
Core Automations for Beginners
Every smart home should start with these five foundational automations. They deliver immediate, tangible benefits with minimal complexity:
- Lights off when no motion detected for 10 minutes — Eliminates forgotten lights. Marcus estimates this saves him $8/month.
- Welcome scene on arrival — Uses phone GPS to trigger lights, thermostat, and music when he gets within 0.5 miles of home.
- Away mode on departure — All lights off, plugs cut power to entertainment systems, security alert activated.
- Good morning scene — At 7:00 AM on weekdays, bedroom light slowly brightens over 20 minutes, coffee maker switches on.
- Door open alert — Push notification if any door or window sensor reports open for more than 5 minutes.
Advanced Automation Patterns
Marcus’s most sophisticated automation uses temperature and occupancy data together. If the bedroom temperature exceeds 74°F and motion is detected after 9 PM, a fan plug activates automatically. The inverse — fan off when room empty or temperature below 70°F — runs simultaneously.
He also built a “TV bedtime” automation. If the living room TV is still on after midnight and no motion is detected for 30 minutes, a push notification fires. If he doesn’t respond in 5 minutes, the TV turns off automatically. This single automation saves an estimated 3–4 hours of standby power weekly.
According to the U.S. Department of Energy, standby power — electricity consumed by devices when “off” — accounts for 5–10% of residential electricity use, costing the average household $100–$200 per year.
Energy Monitoring and Real Savings
Energy monitoring is where budget smart home automation delivers its most measurable ROI. Marcus tracked every kilowatt-hour for 12 months before and after installing his system using the same utility billing data. The results were striking.
His total electricity bill dropped from an average of $94/month to $71/month — a 24.5% reduction. Over 14 months, that’s $322 in direct savings. Combined with $228 in eliminated subscription costs (he’d previously paid for SmartThings Hub and Ring Protect), his total annual savings reached $550.
Which Devices Save the Most Power
| Device | Before Automation | After Automation | Monthly Savings |
|---|---|---|---|
| Entertainment Center | 18W standby | 0W (switched off) | $3.20 |
| Bedroom Lights | 6hrs/day avg | 3.8hrs/day avg | $2.10 |
| Kitchen Appliances | Always plugged in | Cut when idle | $4.50 |
| Office Equipment | On 14hrs/day | On 9hrs/day | $6.80 |
| Bathroom Fan | Manual (often forgotten) | Auto-off after 20min | $1.80 |
The Grafana dashboards Marcus built using free add-ons gave him data no commercial system provides at this price. He could see exactly which outlet was consuming the most power at any hour of the day. That visibility alone changed his behavior — a phenomenon behavioral economists call the observer effect.

“When consumers can see their energy consumption in real time, studies show they reduce usage by 7–15% even without additional automation. Visibility creates accountability — and accountability drives savings.”
Security, Privacy, and Local Control
A connected home is only as safe as its weakest endpoint. Smart home security is a concern that commercial vendors often downplay — because their business model depends on you staying connected to their cloud. Marcus treated security as a first-class concern from day one.
He segmented his smart home devices onto a separate VLAN (Virtual Local Area Network) using a $30 used TP-Link managed switch. This means his smart plugs and sensors cannot access his laptop, NAS, or work devices — even if a device is compromised. This approach requires a router with VLAN support, but many mid-range routers (including those from ASUS and TP-Link) support this natively.
Common Smart Home Security Mistakes
Never expose your Home Assistant instance directly to the internet without authentication. A misconfigured port-forward with no password has led to real-world intrusions. Use Nabu Casa’s $6.50/month cloud tunnel or a properly configured reverse proxy with SSL — never raw port 8123 on a public IP.
Marcus uses Nabu Casa’s remote access subscription ($6.50/month) — the only recurring cost in his entire setup. This gives him secure remote access without exposing any ports. He considered this a non-negotiable safety cost, and it funds Home Assistant’s ongoing development. If remote access isn’t needed, the cost drops to zero.
Privacy Advantages of Local Processing
Every command processed locally is a command that never reaches a corporate server. Your motion patterns, sleep schedule, daily routines, and energy habits are among the most sensitive behavioral data imaginable. Commercial platforms monetize this data in ways buried in 50-page privacy policies.
Home Assistant’s local-first architecture means your data stays on hardware you physically own. Backups go to your own NAS or encrypted USB drive. No terms-of-service change can revoke your access to your own home data. This connects to growing concerns about edge computing and data sovereignty — processing at the source, not in someone else’s cloud.
Scaling Your System Beyond $500
The beauty of a well-designed DIY foundation is that every dollar spent after the initial $500 delivers compounding value. Marcus’s system, 18 months later, now includes 52 devices — but he’s spent only an additional $180 since the initial build.
His expansion strategy was methodical: add one new device category every 6–8 weeks, evaluate it for a full month before expanding. This prevents the “shiny object” syndrome that causes hobbyists to spend $2,000 before realizing what they actually need.
Best Next Devices After the Foundation
- Smart thermostat — A Zigbee-compatible Moes thermostat at $28 integrates natively and can save 10–15% on heating/cooling costs annually.
- Water leak sensors — Aqara water sensors at $16 each have prevented thousands in water damage costs for users who caught slow leaks early.
- Smart locks — Zigbee-compatible locks ($60–$120) enable keyless entry with per-user codes, time-limited access, and automatic locking after 5 minutes.
- Local cameras — Reolink cameras with RTSP support ($35–$60) feed directly into Home Assistant without cloud storage fees.
- Presence detection refinement — Bluetooth Low Energy beacons ($8 each) provide room-level presence detection more accurate than motion sensors alone.
When to Consider Hardware Upgrades
The Raspberry Pi 4 handles 50+ devices comfortably. If you approach 100 devices or add camera-based AI object detection, a used Intel NUC ($80–$150) offers significantly more processing headroom. The migration from Pi to NUC takes about 2 hours using Home Assistant’s built-in backup/restore tool.
Marcus hasn’t needed to upgrade. His Pi 4 idles at 22% CPU and 1.2GB RAM with 52 active devices, 34 automations, and Grafana running. Careful add-on selection — avoiding resource-heavy add-ons like Frigate AI camera analysis — keeps the system lean.
Home Assistant now supports the Matter protocol natively, meaning devices built on this new cross-platform standard work out of the box — future-proofing your investment against ecosystem fragmentation.
Budget Smart Home Pitfalls to Avoid
Marcus’s GitHub post-mortem documented seven mistakes he made during his build. These are the most costly — in time, money, and frustration — that budget smart home automation beginners consistently make.
Technical Pitfalls
The single most expensive mistake is buying incompatible Zigbee devices. Not all devices labeled “Zigbee” are supported by ZHA or Zigbee2MQTT. Before buying, cross-reference against the Zigbee2MQTT supported devices list — it covers over 3,200 verified-compatible devices.
Running Home Assistant from an SD card long-term is another common error. SD cards have a limited write cycle lifespan — typically 3,000–10,000 writes. A busy Home Assistant instance writes frequently (sensor updates, logs, database). SD cards fail in 6–18 months under this load. A $18 USB SSD boot drive solves this permanently.
Buying cheap, unbranded Wi-Fi “Tuya” smart devices can backfire. Many rely on Tuya’s cloud servers, which have had multiple outages. Some can be locally flashed with open-source Tasmota firmware, but this voids warranties and requires technical comfort with hardware modification.
Budget and Scope Pitfalls
Scope creep is real. Many builders start with a $500 goal and spend $1,200 within six months — not because they made bad choices, but because the system works so well they keep expanding. Track every purchase in a spreadsheet before you buy it.
Equally, don’t over-automate too early. Marcus’s first attempt to automate his bedroom lights based on circadian rhythm, sleep tracking, and sunset times resulted in a system so complex it constantly misbehaved. He stripped it back to simple motion-based logic and rebuilt complexity gradually. If you’re looking for similar discipline in another spending category, the principles behind zero-based budgeting apply surprisingly well to hardware purchasing decisions.
“The best smart home automation is invisible — it just works. When users over-engineer logic early on, they spend more time debugging than they save in convenience. Start with the 20% of automations that deliver 80% of the value.”
Real-World Example: Marcus Chen’s $487 Smart Home Transformation
Marcus Chen is a 31-year-old freelance web developer living in a rented 1,200-square-foot apartment in Austin, Texas. In January 2023, he was paying $94/month in electricity and $19/month in smart home subscriptions (SmartThings Hub premium + Ring Protect Basic). He’d had a basic Ring doorbell and three Kasa smart plugs for two years, but “nothing actually automated itself,” he wrote in his build journal. Frustrated with the piecemeal setup, he set a hard budget of $500 and committed to building something that worked completely without subscriptions.
Over three weekends in February 2023, Marcus built his system from scratch. Week one: Pi setup, Zigbee network, and 8 TRADFRI bulbs. Week two: smart plugs, door sensors, and motion detectors. Week three: automation logic, dashboards, and energy monitoring. His total spend came to $487.43. He cancelled his SmartThings and Ring subscriptions immediately, saving $19/month from day one.
By April 2023, his electricity bill had dropped to $74 — a $20/month reduction. By August, as he refined his automations, it stabilized at $71/month. Over 14 months, he saved $322 in electricity and $266 in subscriptions — a total of $588 in recovered costs. His ROI payback period was 14 months. Since then, his system has run without a single major failure, and he’s expanded to 52 devices with an additional $180 in hardware spend.
Marcus now documents his setup publicly and has helped seven friends and family members replicate scaled versions of his build — ranging from $180 (studio apartment, 8 devices) to $620 (three-bedroom house, 40 devices). “The learning curve is real,” he wrote in his 12-month retrospective, “but the curve ends. After that, it just works.”
Your Action Plan
-
Define your scope and set a hard budget ceiling
Before buying anything, list the rooms you want to automate and the specific problems you want to solve (wasted electricity, forgotten lights, security monitoring). Set a hard budget ceiling — $300 for a minimal build, $500 for a comprehensive one. Track every purchase in a spreadsheet from day one to prevent scope creep.
-
Buy and configure your hub first
Purchase a Raspberry Pi 4 (4GB), an official power supply, and a 64GB microSD card. Install Home Assistant OS using Balena Etcher. Boot the Pi, navigate to homeassistant.local:8123, and complete the setup wizard before purchasing any devices. Confirm the system is stable before spending another dollar on hardware.
-
Choose your protocol and buy the corresponding coordinator
For most budget builds, choose Zigbee. Purchase a SONOFF Zigbee USB Dongle Plus ($20) and configure it using the ZHA integration in Home Assistant. Cross-reference every device purchase against the Zigbee2MQTT supported devices list to guarantee compatibility before ordering.
-
Start with smart plugs and door sensors
Your first four devices should be smart plugs with energy monitoring. Install them on your highest-draw appliances (entertainment center, kitchen counter, office desk). Add door/window sensors to every exterior entrance. These deliver immediate, measurable ROI and give you real data about your home’s energy patterns within 72 hours.
-
Build your five core automations
Implement the five foundational automations described in this guide: motion-based lights-off, arrival/departure scenes, a good morning routine, and a door-open alert. Test each automation for 5–7 days before adding complexity. Use Home Assistant’s automation trace tool to debug any logic that misfires.
-
Set up energy monitoring dashboards
Install the InfluxDB and Grafana add-ons. Configure Home Assistant’s Energy Dashboard (built-in since 2021.8) to display per-device consumption. Review your energy data weekly for the first month. Use the data to identify your top three energy wasters and target them with additional automations.
-
Harden your security and access setup
Segment your smart home devices onto a guest VLAN or isolated network using your router’s settings. Enable two-factor authentication on your Home Assistant account. For remote access, use Nabu Casa ($6.50/month) or a properly configured NGINX reverse proxy with SSL — never expose port 8123 directly. Review connected devices quarterly and remove anything unused.
-
Expand methodically using your savings to fund growth
After your first month, calculate your actual energy savings and cancelled subscription costs. Use that money to fund the next phase of your build. Add one new device category every 6–8 weeks, evaluate it thoroughly, then expand. This self-funding expansion model keeps your net cost near zero over time while continuously improving your system.
Frequently Asked Questions
Do I need to know how to code to build a DIY smart home?
No coding is required for most Home Assistant setups. The UI-based automation editor handles the vast majority of use cases without writing a single line. That said, basic YAML configuration is helpful for advanced automations, and Home Assistant’s documentation is exceptionally beginner-friendly. Most users learn what they need through community forums and YouTube tutorials within a few weekends.
Is $500 a realistic budget for a complete smart home?
Yes — with careful hardware selection. As Marcus’s build demonstrates, $487 can cover a hub, Zigbee coordinator, 8 smart bulbs, 6 smart plugs with energy monitoring, 6 door sensors, 4 motion sensors, and 2 temperature sensors. The key is choosing Zigbee devices over Z-Wave and sourcing from IKEA, AliExpress, or Amazon’s budget brands rather than premium manufacturers like Philips Hue or Lutron.
Can I use budget smart home automation in a rented apartment?
Absolutely. Most of the devices in this guide require no installation beyond plugging in. Smart bulbs replace standard bulbs (and can be replaced back on move-out). Smart plugs plug into existing outlets. Zigbee sensors attach with adhesive mounts, not screws. Door sensors sit on existing door frames with removable 3M strips. The entire system is portable and can move with you.
What happens if the internet goes down?
With Home Assistant’s local processing, your automations continue running without internet access. All sensor triggers, scheduled automations, and device commands process on your local Raspberry Pi. The only features that require internet are cloud-dependent integrations (like weather data or remote access). Local voice assistants like Wyoming + Whisper run entirely offline as well.
How reliable is Zigbee compared to commercial systems?
Zigbee’s mesh networking means reliability improves as you add devices. With 10+ mains-powered devices, the mesh becomes robust enough that individual device failures don’t disrupt the network. Marcus reported zero automation failures attributable to Zigbee connectivity in 14 months of operation. Commercial Zigbee hubs (like those in Samsung SmartThings) use the same underlying protocol — the DIY implementation is equally reliable.
Can I integrate voice assistants with a DIY Home Assistant setup?
Yes, multiple options exist. You can connect Google Assistant or Amazon Alexa to Home Assistant via Nabu Casa’s cloud integration. For a fully local, privacy-preserving option, the Wyoming integration with Whisper (speech-to-text) and Piper (text-to-speech) runs entirely on your Pi or a nearby machine — no cloud required. Local voice processing on a Pi 4 handles simple commands in about 1–2 seconds.
Will my smart home devices still work if the company goes out of business?
Zigbee and Z-Wave devices operate using open standards — they don’t depend on any manufacturer’s servers. If IKEA discontinued its TRADFRI line tomorrow, Marcus’s TRADFRI bulbs would keep working indefinitely through Home Assistant’s ZHA integration. The risk is highest with Wi-Fi devices that require proprietary cloud backends — another reason to prioritize open-protocol hardware for budget smart home automation.
What’s the learning curve like for Home Assistant?
Most users report a steep initial weekend followed by a gradual plateau. The hardest part is understanding YAML syntax for advanced configurations — but the UI editor handles most tasks without it. The Home Assistant community at community.home-assistant.io is one of the most active and helpful in open-source software, with answers to virtually every question a beginner might have.
Can I monitor my smart home remotely while traveling?
Yes. Nabu Casa’s $6.50/month subscription provides secure remote access with no technical configuration. Alternatively, a Wireguard VPN (free, runs as a Home Assistant add-on) tunnels you securely into your home network from anywhere in the world. The Companion App for iOS and Android provides a full dashboard, push notifications, and remote device control. Staying connected to your home’s data also pairs well with how wearable technology is expanding personal monitoring capabilities into new domains.
How does budget smart home automation affect home resale value?
Studies from the National Association of Realtors suggest smart home features can add 3–5% to a home’s perceived value, though this varies significantly by market and feature quality. More practically, a DIY system adds value through lower utility bills — a verifiable monthly savings that can be documented for potential buyers. Since the hardware is modular, you can choose to leave desirable devices (like built-in switches) or take portable ones (like smart plugs) with you.
Sources
- Statista — Smart Home Market Worldwide Revenue and Forecast
- U.S. Department of Energy — Reducing Standby Power Loads
- U.S. Energy Information Administration — Electric Power Monthly
- HomeAdvisor — Smart Home Installation Cost Guide
- Zigbee2MQTT — Supported Devices Database
- Home Assistant — Raspberry Pi Installation Guide
- Resources for the Future — Smart Meters and Real-Time Feedback on Energy Consumption
- Parks Associates — Smart Home Device Adoption and Barriers Report 2023
- National Association of Realtors — Remodeling Impact Report
- Connectivity Standards Alliance — Matter and Zigbee Protocol Specifications
- Nabu Casa — Home Assistant Cloud Pricing and Features
- Raspberry Pi Foundation — Pi 4 Model B Specifications
- Balena Etcher — Free Flash Tool for OS Images
- Home Assistant Community Forum — Official Community Support
- U.S. Department of Energy — Smart Thermostats and Home Automation Savings