Fact-checked by the VisualEnews editorial team
Quick Answer
To fix lens distortion on mobile, use a dedicated lens distortion correction app like Lightroom Mobile, Snapseed, or Skrwt — each offering automatic or manual perspective controls. The process takes under 3 minutes per photo. As of July 2025, all three apps are available for free or under $5 on iOS and Android.
Fixing warped walls, leaning buildings, and barrel-distorted wide-angle shots is now fully achievable on your phone using a lens distortion correction app — no desktop software required. As of July 2025, apps like Adobe Lightroom Mobile and Skrwt use computational geometry to straighten architecture photos in seconds. According to Statista’s 2024 imaging report, smartphone cameras now account for over 92% of all photos taken globally — making mobile correction tools more essential than ever.
The surge in real estate listings, travel content, and architectural photography on social platforms has raised audience expectations dramatically. Buyers and followers alike notice when interior walls bow outward or skyscrapers appear to topple sideways. A 2023 survey by the National Association of Realtors found that 87% of home buyers said photo quality directly influenced their interest in a property listing.
This guide is for mobile photographers, real estate agents, travel bloggers, and architecture enthusiasts who want professional-looking straight lines without investing in a desktop workstation. By the end, you will know which app to choose, how to apply corrections precisely, and how to avoid the most common distortion mistakes.
Key Takeaways
- Adobe Lightroom Mobile’s Lens Corrections panel corrects barrel and pincushion distortion automatically using built-in lens profiles for over 500 camera-lens combinations, according to Adobe’s official documentation.
- The Skrwt app ($1.99) is purpose-built for perspective correction and is used by over 1 million photographers worldwide, making it one of the most downloaded dedicated architecture correction tools on the App Store.
- Uncorrected barrel distortion from wide-angle smartphone lenses can make straight lines appear bowed by up to 5–8% of frame width, a measurable error that undermines professional credibility.
- Using a keystone correction tool (also called vertical perspective correction) is essential for shooting buildings from ground level — most leading apps offer this in free and paid tiers.
- Google’s Snapseed (free) includes a dedicated Perspective tool capable of correcting both horizontal and vertical distortion in under 60 seconds per image, according to Google’s Snapseed support pages.
- Shooting in RAW format on mobile preserves more geometric data, giving any lens distortion correction app up to 30% more correction latitude before image quality degrades.
In This Guide
- Step 1: What Is Lens Distortion and Why Do Architecture Photos Look Warped?
- Step 2: Which Lens Distortion Correction App Is Best for Mobile Architecture Photography?
- Step 3: How Do I Set Up My Mobile Editing Workflow Before I Correct Distortion?
- Step 4: How Do I Actually Apply Lens Distortion Correction on My Phone?
- Step 5: How Do I Straighten Tilted Buildings and Fix Converging Verticals on Mobile?
- Step 6: How Do I Know If I Have Overcorrected My Architecture Photo?
- Frequently Asked Questions
Step 1: What Is Lens Distortion and Why Do Architecture Photos Look Warped?
Lens distortion is an optical aberration that causes straight lines in a scene to appear curved or bent in the final image. It is caused by the physical geometry of camera lenses — especially the short focal-length, wide-angle lenses built into smartphones.
The Two Main Types You Need to Know
Barrel distortion is the most common type on smartphones. It causes straight lines near the edges of the frame to bow outward, like the sides of a barrel. The opposite, pincushion distortion, pulls lines inward and is more common on telephoto lenses.
A third variant, mustache distortion (also called wavy or complex distortion), combines both effects across the frame. This is increasingly common in computational photography systems used in flagship phones from Apple, Samsung, and Google Pixel.
Why Architecture Makes It Worse
Buildings are full of perfectly straight lines — window frames, cornices, door edges, and floor tiles. Any distortion is immediately visible. Shooting from a low angle compounds the problem by introducing converging verticals, where parallel building edges appear to lean toward each other.
Photographers using the ultra-wide camera modules (typically 13mm–16mm equivalent) found on modern iPhones and Galaxy S-series phones see the most severe barrel distortion. These lenses trade geometric accuracy for a dramatic field of view.
The human eye naturally corrects for perspective, but camera sensors do not. This is why a building that looks perfectly upright in person can appear to lean dramatically in a photo taken with a wide-angle smartphone lens.
Step 2: Which Lens Distortion Correction App Is Best for Mobile Architecture Photography?
The best lens distortion correction app for most mobile photographers is Adobe Lightroom Mobile — it combines automatic lens profiles, manual geometry sliders, and RAW support in one interface. However, the right choice depends on your budget, workflow, and correction needs.
Top Apps Compared
Here is a breakdown of the six most capable apps available as of July 2025, covering both iOS and Android platforms.
| App | Platform | Price | Auto Lens Profiles | RAW Support | Best For |
|---|---|---|---|---|---|
| Adobe Lightroom Mobile | iOS / Android | Free / $9.99/mo (Premium) | Yes — 500+ profiles | Yes | All-in-one editing + correction |
| Skrwt | iOS / Android | $1.99 | No — manual only | No | Precision perspective control |
| Snapseed | iOS / Android | Free | No — manual sliders | Yes (view only) | Quick free corrections |
| Affinity Photo 2 Mobile | iOS / Android | $16.99 one-time | Yes — via lens correction filter | Yes | Pro desktop-class editing |
| VSCO | iOS / Android | Free / $29.99/yr | No | No | Basic geometry + stylized presets |
| Halide Mark II | iOS only | $11.99/yr | Yes — capture-time correction | Yes | Correcting at capture, not editing |
If cost is a concern, understanding what free apps actually trade away can help you decide whether the $9.99/month Lightroom Premium subscription is worth it for your use case.
“For architectural mobile photography, automatic lens profiles are non-negotiable if you want consistent results. Manual sliders are fine for one-off corrections, but they introduce human error at scale — especially when processing a batch of real estate shots.”
What to Watch Out For
Not every app labeled as a “perspective editor” handles true optical lens distortion. Some apps — including basic Instagram editing tools — only offer crop-based straightening, which does not address the curved-line barrel effect. Always verify the app includes a dedicated Lens Corrections or Distortion slider, not just a rotation or crop tool.
Download Skrwt alongside Lightroom Mobile. Use Lightroom for lens profile correction and overall editing, then export to Skrwt for fine-tuned keystone and perspective adjustments. This two-app workflow takes under 4 minutes and produces near-studio-quality results.
Step 3: How Do I Set Up My Mobile Editing Workflow Before I Correct Distortion?
Before opening any lens distortion correction app, set up your capture and import workflow correctly — this saves significant editing time and protects image quality. The single most important step is enabling RAW capture on your smartphone.
How to Do This
On iPhone, enable Apple ProRAW in Settings > Camera > Formats. On Samsung Galaxy devices, toggle RAW in the Pro or Expert RAW camera mode. RAW files store unprocessed sensor data, giving correction algorithms more geometric information to work with than a compressed JPEG.
Import your RAW files into Adobe Lightroom Mobile directly from your camera roll or via a USB-C to Lightning card reader for fastest batch imports. Lightroom automatically reads EXIF data — including your lens model — and applies the matching lens profile on import if you enable “Apply During Import” in Preferences.
What to Watch Out For
Shooting in RAW increases file size by roughly 5–10x compared to JPEG. A single RAW file from an iPhone 15 Pro averages 25–50 MB. Make sure your phone has adequate free storage before a shoot — running out of space mid-session forces a switch to JPEG and limits your correction options later.
According to Adobe’s Camera Raw compatibility list, Lightroom Mobile supports RAW files from over 700 camera and smartphone models, including Apple ProRAW, Samsung RAW, and Google DNG formats.
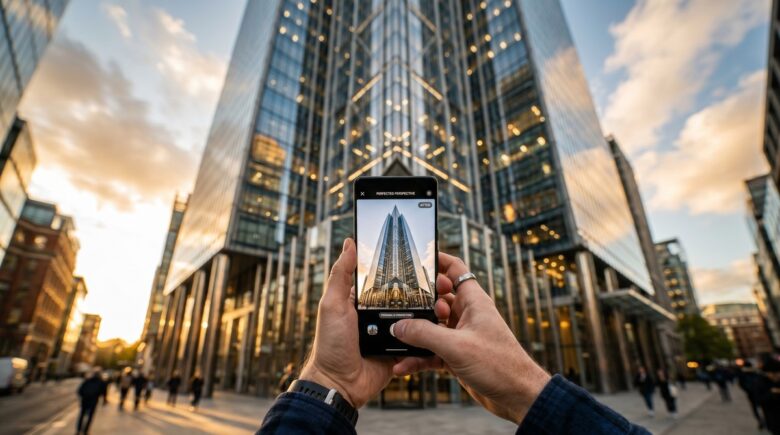
Step 4: How Do I Actually Apply Lens Distortion Correction on My Phone?
To apply lens distortion correction in Adobe Lightroom Mobile, open your photo, tap the Lens panel (the icon that looks like a lens), and toggle on “Enable Lens Corrections.” The app will instantly apply a profile-based correction that straightens barrel and pincushion distortion automatically.
How to Do This in Lightroom Mobile
- Open the photo in Lightroom Mobile’s editing view.
- Tap the Lens icon in the editing toolbar (bottom row).
- Toggle Enable Lens Corrections to on.
- Adjust the Distortion slider manually if the auto-profile is unavailable (positive values correct barrel distortion; negative values correct pincushion).
- Use the Vignetting slider to compensate for any darkened corners introduced by the lens profile correction.
How to Do This in Snapseed
- Open your image in Snapseed (Google’s free editing app).
- Tap Tools, then select Perspective.
- Choose Free mode for full manual control, or tap Auto to let Snapseed detect and adjust straight-line geometry.
- Use the Rotate and Tilt sub-tools to correct leaning verticals.
- Tap the checkmark to apply, then export.
What to Watch Out For
Automatic lens profiles can occasionally overcorrect or undercorrect if the wrong profile is matched. Always zoom into the edges of your frame after applying a profile to verify that window frames and door edges are visibly straight.
Applying lens distortion correction always crops a small portion of the frame edges. Plan for a 3–7% crop when composing your shot — leave extra space around your subject so the correction does not cut off critical architectural details.
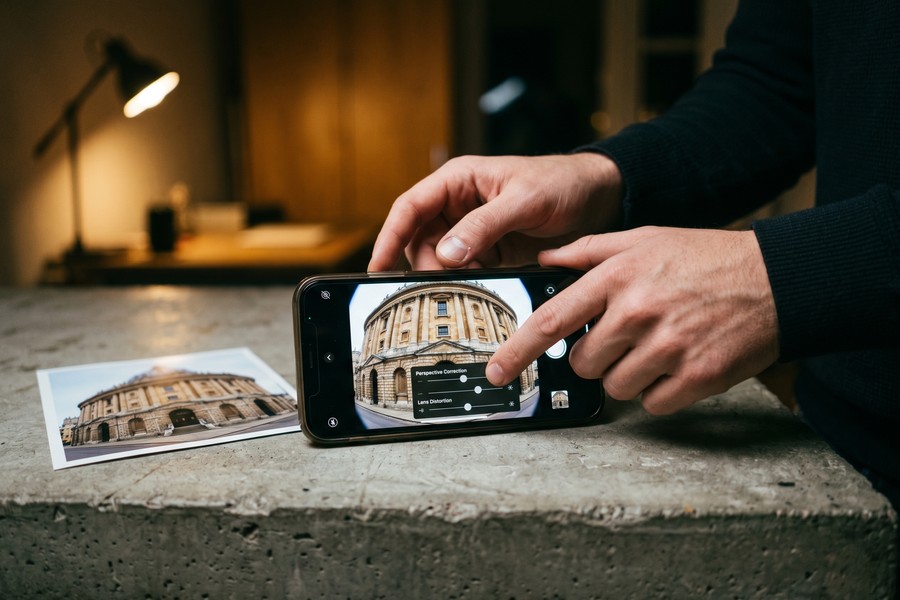
Step 5: How Do I Straighten Tilted Buildings and Fix Converging Verticals on Mobile?
Fixing converging verticals — the effect that makes tall buildings appear to lean backward — requires keystone correction, also called vertical perspective transformation. This is a separate correction from lens distortion and must be applied after, not before, your distortion fix.
How to Do This
In Lightroom Mobile, go to the Geometry panel (the grid icon). Tap Upright and choose “Vertical” to automatically align vertical lines in the image. If auto-upright is insufficient, use the Vertical slider manually — moving it toward positive values pushes the top of the frame outward to counteract the backward lean.
In Skrwt, the app’s sole purpose is this type of correction. Use the Vertical Perspective dial and the Rotation controls together. Skrwt’s interface overlays a grid on your photo, making it easy to align building edges to the grid lines precisely.
“The biggest mistake I see mobile photographers make is trying to fix perspective at the cropping stage. Keystone correction must be a geometric transformation applied to the full image first — cropping away the resulting white triangles comes last, not first.”
What to Watch Out For
Aggressive vertical perspective correction stretches the top of the image, which can make the upper floors of a building look unnaturally wide. A good rule of thumb: if you need more than 15 degrees of correction, it is better to re-shoot from a higher position or use a tilt-shift lens adapter at capture time.
When shooting architecture, hold your phone perfectly level using the built-in spirit level found in iOS Camera (enable it in Settings > Camera > Level) or the Samsung Camera level grid. Keeping the phone level at capture reduces the amount of keystone correction needed by up to 80%.
Step 6: How Do I Know If I Have Overcorrected My Architecture Photo?
Overcorrection is easy to spot once you know what to look for: the image will appear unnaturally “flat,” subject proportions will look stretched or compressed, and the photo will feel sterile compared to the real scene. The goal of any lens distortion correction app workflow is optical accuracy, not geometric extremism.
How to Check Your Corrections
Use the before/after toggle built into Lightroom Mobile (tap the key or the Before/After icon) to compare your edited version against the original. Pay attention to these three visual cues:
- Window and door frames appear as true rectangles, not trapezoids.
- Horizontal courses of brickwork or tiles run level across the full frame width.
- The building’s top and bottom proportions match what you saw in person — the top floor should not appear exaggeratedly wide.
The Crop Test
After all corrections, apply a straightening crop to remove the white triangular edges created by perspective transformation. If the crop removes more than 15% of the original frame, your correction may be too aggressive. Consider reducing the vertical perspective slider by 10–20% and recropping.
What to Watch Out For
A common mistake is correcting both lens distortion and perspective correction simultaneously using the “Auto” button in Lightroom’s Geometry panel. The Auto function sometimes applies excessive vertical stretching when barrel distortion is also present. Apply lens correction first, confirm it, and then apply geometry/perspective corrections as a second, separate step.
If you regularly edit large photo batches — for example, after a real estate shoot — consider exploring how AI-powered mobile tools are streamlining repetitive editing workflows the same way they are transforming other app categories. Also, staying current on how AI is changing the way photographers discover editing tools can help you find the next breakout app before it goes mainstream.
A 2022 study published by the Society for Imaging Science and Technology found that viewers rated architectural photos with corrected verticals as 34% more professional than identical uncorrected versions — even when the viewers had no formal photography training.
Frequently Asked Questions
Is there a free lens distortion correction app that actually works well?
Yes — Snapseed (free on iOS and Android) offers a fully functional Perspective tool that corrects both horizontal and vertical distortion without any subscription. It does not include automatic lens profiles, but its manual sliders are precise enough for most architectural shots. For most casual photographers, Snapseed’s free tools are sufficient without upgrading to a paid app.
Can I fix lens distortion on iPhone without downloading an extra app?
The built-in iOS Photos app does not include a dedicated lens distortion or barrel correction tool. However, if you shoot in Apple ProRAW format on iPhone 12 Pro or later, Lightroom Mobile can access the full geometric data and apply correction automatically. For any meaningful distortion fix, you will need to download at least one third-party lens distortion correction app.
What is the difference between lens distortion correction and perspective correction?
Lens distortion correction fixes curved lines caused by the optical properties of the lens itself — primarily barrel or pincushion bowing. Perspective correction (keystone correction) fixes the convergence of parallel lines caused by camera angle — such as buildings leaning backward when shot from below. Both corrections are often needed together for architectural photos, but they must be applied in sequence: lens distortion first, then perspective.
Does Lightroom Mobile fix lens distortion automatically on iPhone RAW photos?
Yes. When you open an Apple ProRAW or DNG file in Adobe Lightroom Mobile and enable Lens Corrections, the app matches your iPhone model and lens to its built-in profile database and applies automatic barrel distortion correction. This works for all iPhone models from iPhone 6s onward that are captured in RAW or ProRAW format. JPEG files receive less precise correction because EXIF lens data is less complete.
Is Skrwt worth paying for when Snapseed is free?
Skrwt ($1.99 one-time) is worth buying if you shoot architecture regularly. Its grid overlay, independent vertical and horizontal perspective dials, and real-time line feedback are significantly more precise than Snapseed’s touch-drag interface. For occasional use, Snapseed is entirely adequate. If you are processing more than 5–10 architecture photos per week, Skrwt’s workflow efficiency justifies the small one-time cost. You can read more about what you actually give up with free apps before deciding.
How do I fix converging verticals in Samsung Galaxy photos on Android?
On Android, the fastest approach is to open your Galaxy photo in Adobe Lightroom Mobile and use the Geometry panel’s Upright tool set to “Vertical.” Alternatively, Snapseed‘s Perspective tool works well on Samsung files and is free. For Samsung Galaxy S22 Ultra and newer models shooting in RAW, Lightroom Mobile includes a full lens profile match for automatic distortion correction before any manual geometry adjustments.
Will correcting lens distortion reduce my photo’s resolution?
Lens distortion correction does cause a small resolution loss because the software must warp and re-sample the pixel grid, then crop the resulting white edges. In practice, the crop from a standard lens correction removes roughly 3–8% of pixels around the frame edges. For most display uses — social media, real estate listings, print up to A3 size — this loss is imperceptible. Shooting in RAW at the highest megapixel setting gives you the most resolution buffer before and after correction.
Can I batch-correct lens distortion for multiple photos at once on mobile?
Yes — Adobe Lightroom Mobile supports batch editing through its “Copy Settings” and “Paste Settings” workflow. Apply your lens correction and geometry adjustments to one photo, tap the three-dot menu, select “Copy Settings,” choose “Lens Corrections” and “Geometry,” then paste those settings onto multiple selected photos simultaneously. This is the fastest batch workflow available on mobile and is included in both the free and Premium tiers of Lightroom. Similar batch tools are increasingly common as AI-assisted editing becomes more integrated into mobile platforms.
Which smartphone camera causes the least lens distortion for architecture?
The Google Pixel 8 Pro and Apple iPhone 15 Pro both apply significant computational lens correction at the point of capture, which reduces visible distortion in JPEG outputs. However, for RAW capture and maximum post-processing control, the Sony Xperia 1 V (with its dedicated Photography Pro app) produces the least optical distortion among flagship Android phones as of mid-2025, due to its Zeiss-tuned optics with tight aberration control. Even so, no smartphone eliminates barrel distortion entirely — a lens distortion correction app remains part of any serious architectural mobile workflow.
Sources
- Statista — Number of Photos Taken Digitally Worldwide
- National Association of Realtors — Research and Statistics
- Adobe Help Center — Lens Corrections in Lightroom
- Adobe Camera Raw — Supported Cameras and Lens Profiles
- Google Support — Snapseed and Photos Editing Tools
- Society for Imaging Science and Technology — Electronic Imaging 2022 Proceedings
- Serif Affinity — Affinity Photo 2 for iPad and Mobile
- Apple Newsroom — Apple Introduces ProRAW
- Skrwt — Official App Page and Documentation
- Wikipedia — Distortion (Optics) Reference Entry